SQL Server Database Maintenance Plans help users to maintain SQL databases and their structures. It also helps to automate many database administration tasks in Microsoft SQL Server. You can create maintenance plans very easily by using an easy wizard-based process. SQL Server Maintenance Plans is the group of many tasks that you need to perform on SQL Server Database to improve the performance and availability.
You can easily check the list of tasks in the below picture:

You can select the maintenance tasks from “Maintenance Plan Wizard” whatever you want to perform. You can also select one or more tasks according to your need. You can also change the sequence of the tasks on Select Maintenance Task Order page; use the Move Up and Move Down buttons.

Before creating the maintenance plan, please check out some benefits & shortcomings of maintenance plan:
Benefits:
- Support for multiserver plans
- Support for logging plan history to remote servers.
- Support for Windows & SQL Server Authentication.
Shortcomings:
It is not cover all database maintenance options: If you want to use any other database maintenance option which is not available in the “Maintenance Plan Wizard” then you have to use scripts for those tasks.
Can’t Run Multiple Tasks: Some tasks become difficult to perform because it can only run once within a single maintenance plan. Like if you create a plan to delete backup files then it can delete one file type at a time not multiple backup file type at the same time.
Can't script and moved to other SQL Server instances: When we create Maintenance Plans with the Wizard, it cannot be scripted and moved to other SQL Server instances. But you can created multi-server Maintenance Plans.
Bugs available in earlier SQL Server versions: There are few bugs available in earlier version of SQL Server Maintenance plan but it get resolved in SQL Server 2005 Service Pack 2 or higher, or SQL Server 2008.
Let’s discuss one by one:
1. Define Database Check Integrity (CHECKDB) Tasks
First Select “Check Database Integrity” option that allows you to check internal consistency of the database then index database pages. After selecting this option, you will see “Define Database Check Integrity Task” panel.

On the Define Database Check Integrity Task page, click on the drop-down button to the right of the database. Now you will have four options:
1) All databases
2) System databases
3) All user databases
4) These Databases
Choose your database from the list or you can also select multiple databases. After that Click OK to close the database selection window, then click next.
Define Database Shrink Tasks
First Select “Shrink Database” option that allows you to shrink databases which compact the database and saves diskspace. This process is done by clearing logs and empty data pages.

On the Define Shrink Database Task page, click on the down-arrow to the right of Database. Now you will have four options:
1. All databases
2. System databases
3. All user databases
4. These Databases
Choose your database from the list or you can also select multiple databases. After that Click OK to close the database selection window. Click Next.
Reorganize Index
First Select “Reorganize Index” option that allows you to Reorganize index function, defrag indexes on sql tables. You can also check which improves search performance with the help of this option.
Rebuild Index
First Select “Rebuild Index” option that allows you to rebuild the whole index. It helps to increase the search times.
On the Define Rebuild Index Task page, you will see three options:
1. Databases
2. Free Space Options
3. Advanced Options
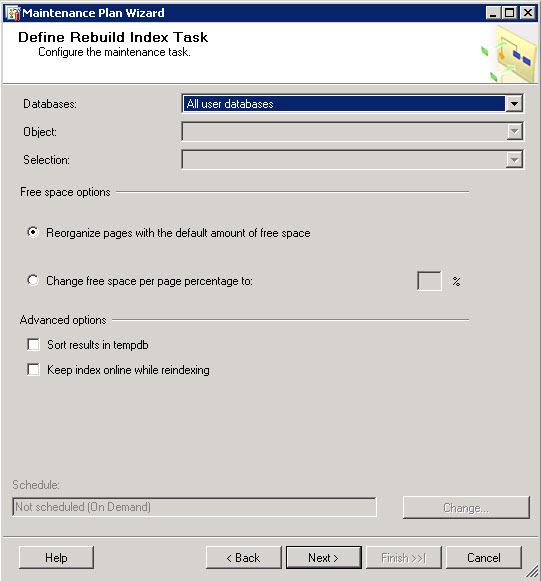
Choose your database from the list or you can also select multiple databases. After that click on checkbox 'reorganize pages with default amount of free space'. Click Next.
Define the Update Statistics Task
First Select “update statistics task” option to ensure that table values are up to date. It helps to make better decisions regarding data access.
On the Define the Update Statistics Task page, you will see three options:
1. Databases
2. Update
3. Scan Type

Choose your database from the list or you can also select multiple databases. After that click on checkbox 'all existing statistics' and 'Full Scan' Click Next.
Define the History Cleanup Task
On the Define History Cleanup Task page, you can select historical data to delete after that click Next.

Define the Execute Agent Job Task
On the Define Execute Agent Job Task page, you can select a single job or multiple jobs to run. This option is not available if you have no SQL Agent jobs.
Define Backup Tasks:
You can use this option to perform full, differential and log backups to prevent database from corruptions. To create a backup job on SQL Server 2012 using maintenance plans:
On the Define Back Up Database (Full) Task page, click the down-arrow to the right of Databases and choose your database from the list. Choose the media for the backup (i.e., Disk or Tape) and the location for the backup. Select Verify backup integrity. Click Next.

Define Maintenance Cleanup Tasks
On the Define Maintenance Cleanup Task page, you can delete same type of files at the same time.
For this, first specify the types of files to delete including text reports created by maintenance plans and database backup files. You can also delete specific file by using “File location option”. Or there are multiple option to delete a file. After that click 'Next'

After finishing all maintenance option, now you need to select report option.
Select Report Option:
You can save report maintenance plan as indicate in following picture:
1.Save it in a folder
2.email report
Complete the Wizard:
In the last step, review your plan what you are creating. After that click on Finish button
You can also edit your maintenance plan if you wish to. You can do it by using SQL Server agent.
Here is the small overview:

Congratulation your maintenance plan is ready.
No comments:
Post a Comment