SQL Server 2012 introduced a new feature named as FileTable that allows you to store file, directory, and documents in a special table that builds on the top of SQL Server FILESTREAM technology. The benefit of this feature is that it provides Windows API compatibility for file data stored within a SQL Server database & also compatible with SQL Server features including management tools, services and file attribute data. SQL Server also supports backup and restore job for this feature.
Below three steps must be completed, in order to creating and using FileTable:
1. Enable FileStream at the instance Level
2. Create a FILESTREAM-Enabled Database
3. Create a FileTable
1. Enable FileStream at the instance level Via SQL Server Configuration Manager:
- Open SQL Server configuration Manager.
- Locate SQL Server Instance on which, you need to enable file stream on it.
- Right click on instance and select Properties
- Select Filestream and Click on the checkboxes 'Enable FILESTREM for transact SQL access' and 'Enable FILESTREM for file I/O access' and enter windows share name as well.
2. Create a FILESTREAM-Enabled Database Via SQL Server Management Studio:
- Create a new database in SQL Server Management Studio by right click on the database.
- Now enter all the information required to create a simple database.
- Click on options and set two properties mark as red circle in the image:
- Now click Ok. Finally database is created.
3.Create a FileTable Via SQL Server Management Studio
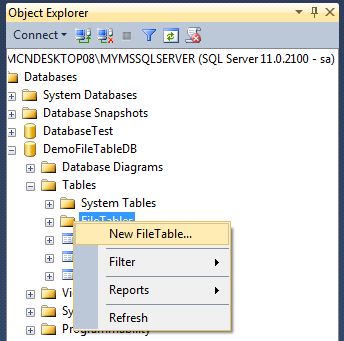
In Object Explorer, Right click on the Tables folder, and then select New FileTable.
Now a new script window will open. It contains a T-SQL template that you can customize and run to create a FileTable.
I will recommend this feature to all users who want to store files/directories inside database.
Have you ever face the SQL Server Management Studio crashes issue without saving the SQL scripts. In this case, SQL SERVER Auto Recovery Scripts is one of the helpful features introduced in SQL Server 2012. It automatically saves open SQL scripts according to user definable period of time. By default, this time period is set for 5 minutes. User can change it according to their needs. By default, this feature is turned on with default settings in SQL SERVER 2012 (SSMS).
Location of Auto Recovery Option in SSMS:
This option is available in Tools >> Options >> Environment >> AutoRecover
Settings available in Auto Recovery:
Given below are the settings available in Auto Recovery.
- Save AutoRecover Information every: By this setting, you can set automatic saving of your script; it means after how many minutes your script should be saved automatically. By default, this setting is after 5 minutes.
- Keep AutoRecover information for : By this setting, you can set for how many days SSMS should keep those files. By default, this setting is 7 days.
Here is full overview picture of Auto Recovery setting:
You can find the recovery files here: C:\Users\windows user\Documents\SQL Server Management Studio\Backup Files\Solution1
NOTE: SSMS window might get hang for some time due to “Saving Auto Recovery information“.
If you want to disable this feature then you can also do this by using two methods:
First Method:
Open SSMS 2012 & click on Tools >> Options
Uncheck "Save AutoRecover information every" checkbox to disable Auto Recovery:

Second Method:
You can also do it by make adjustment in registry setting.
1. Open Registry
Start -> Run -> RegEdit
2. Find and modify registry value
The location of this registry key in SSMS 2012:
HKEY_CURRENT_USER\Software\Microsoft\SQL Server Management Studio\11.0\General\AutoRecover
When you double click on “AutoRecover Enabled" then its value will be "1" (ON), it means that Auto Recovery setting is enable. To disable Auto Recovery setting, set it to "0" (OFF) then press OK to save.
So you can easily recover your unsaved SQL script from SQL Server Management Studio by using SQL Server 2012 AutoRecovery Feature.